Tuesday, August 27, 2013

Nail Post - My First Time Using Nail Studs

So I have to start off with saying, this really is my first time wearing nail studs. I have super weird texture issues, and I absolutely hate when my nails aren't smooth. Even glitter polish bothers me if I don't put enough topcoat on them. *shiver*

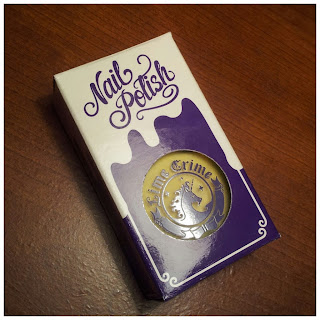
But I just took the Lime Crime Creme de Limon polish from my August Ipsy bag, and added a simple design and a few studs to them. 

Here is just the swatch of the Lime Crime polish.


Then I did the unthinkable and actually put nail studs on my nail! I was actually a little tipsy when I was doing these, lol, so when I touched them for the first time after they dried, I kind of freaked out.
My husband was like, "Mikey what's wrong?"
All I could reply with was that my nails feel so wrong haha.

My daughter absolutely loves them. She thinks they feel so cool. Every time she remembers I have them on, she will come over and rub them for like 5 minutes.

To put them on, I just dabbed a bit of topcoat onto the nail. Using the tip of a pencil dipped in a bit more topcoat, I touched it to the nail stud to transfer it onto my nail. Then I used my finger to push it into place. I topped everything off with a good layer of topcoat to seal the stud into place.

Here's the finished result:


Thanks for reading! Like and comment for me.

Kiss, Kiss.
-A

Saturday, August 24, 2013

Product Review - August Ipsy Glam Bag (finally!!!!)

After waiting, and waiting, and waiting, and waiting some more

I FINALLY GOT MY IPSY BAG!

It only took 11 days to get here >:(

I know Ipsy was having trouble with shipping this month, but goodness! I NEVER have to wait that long to get my bag. The longest it ever took, was about 3 days after I got my tracking code. A lot of the time, I get it either the same day or the day after. But whatever...

So this month's theme was Back To School, which is super appropriate. This month's bag is way too cute. It's a gorgeous royal purple color with gold print. I love it. It's my favorite bag to date.


I got six products this month. They are:

Pixi Cosmetics Lash Boosting Mascara in Blackest Black


I wore it for school and work today, and it went on really easily. It coats well and the color is really good. They really do mean blackest black. With that being said, I did not like this mascara. It is not volumizing or lengthening at all. I'm not really sure why they call it lash boosting, because it does not do that at all. I'll be giving this to my mom or sister.
[x] Pass [] Buy

Noya Natural Lip Balm in Cherry (FULL SIZE)


Just like everyone else, I really wanted the UD lippie, but I don't actually think I would have liked either color on me. Oh well. With that being said, I have super dry lips, so getting a lip balm was pretty great. It is super hydrating, the packaging is really cute, and it made of all natural ingredients! Did I mention how cute the packaging was?
[] Pass [x] Buy

Chella Eyebrow Color Pencil in Dazzling Dark Brown (FULL SIZE)


I was not thrilled about getting this brow pencil, but I actually really liked it. The packaging is pretty and the color is actually really great. It goes well with my newly dyed hair. It's not as thick or full a brow product as I like, but it definitely does what it's supposed to do. It's good to use if you like a more natural looking brow. It also comes with a twist up cap so you don't lose any product to sharpening.
[] Pass [x] Buy

Michael Todd True Organics Jojoba Charcoal Facial Scrub


Ok I was really excited about the Michael Todd stuff. I didn't care whether I got the scrub or the mask (although I wanted the mask a bit more because I love pumpkin scented things). The scrub smells fantastic. It doesn't have an outdoorsy smell like I thought it would because of the charcoal. It smells fresh and clean like a scrub should. As far as the function goes, it works well. It isn't very gritty, though, but I like a pretty gritty scrub. It does leave your skin feeling really soft afterwards.
[] Pass [x] Buy

Pacifica Natural Skincare Alight Multi-Mineral BB Cream


This product scared me a bit. I don't like getting things that I'm not sure will match my skin tone. This BB cream claims to match any skin tone, and it isn't wrong. It was a bit light at first, but as it settled, it did blend pretty well. It has a slight shimmer to it, which I just love. Some people might not like the shimmer, but you could always use it as a highlight if you don't want to use it all over. I do really wish that it came in a darker shade for when I want a little more coverage. And it has not SPF. :(
[x] Pass [] Buy

And my referral product for the month, the Lime Crime Nail Polish in Crema De Limon


I am wayyyyyyyy too excited to own this! First of all, the packaging!!!!! It is DIVINE! I own nothing else by Lime Crime, so I kind of lost it when I got this. The actual bottle is super cute. The plastic is frosted and has the infamous purple unicorn on the front.
[] Pass [xxxxxxxxxxxxx] Buy

Bag Value:
Pixi Macsara - 7.14$
Noya Lip Balm - 3.99$
M Todd Scrub - 5.29$
Pacifica BB Cream - 5.44$
Lime Crime Polish - 8.00$

Total: 29.86$ USD

So I was initially really upset with this bag based on all the other options we had, but I'm overall really happy with it. The value of this bag isn't nearly as high as past bags, but it was worth triple what I paid for it. I was really upset about the shipping time, but I know I'm not the only one who got their bag really late. My sister still hasn't gotten hers. Hopefully next month's bag (a week from now) will be better and on time.

Thanks for reading, you guys. If you wanna subscribe to Ipsy, it's only 10$ a month. Click here for mobile users to visit the site, or click the link in the top right of the page. Stay tuned and stay lovely.

Kiss, Kiss.
-A

Wednesday, August 21, 2013

Feature/Nail Post - An Amazing Youtube Nail Artist

I love doing my nails (and anyone else I can get near), and I learn a lot of techniques and designs on Instagram and Youtube.

I recently subscribed to her channel, but Janelle from elleandish is really amazing at what she does.

Her tutorials are really easy to follow, her voice is soothing (which is a big deal for me because I hate talented people cursed with harsh or annoying voices), and she always has soft music in the background.

She always has a very clear list of supplies at the beginning of each video, and she even adds color options at the end!


Here are a few of her tutorials that I love:

Mint Leopard Nails

Pink and Orange Kate Spade Nails

and her most recent upload, Marc Jacobs Daisy Inspired Nails

Here is my color list:
  • Sation "Love at First Byte"
  • Chinaglaze "White Out"
  • Karaza #39
  • Nicole by OPI "A Gold Winter's Night"
  • Essie "Navigate Her"
  • Wet N Wild "Dreamy Poppy"
  • Wet N Wild "Sunny Side Up"

Here is my attempt at her Marc Jacobs Daisy Sunshine color scheme nails:

Hey thanks for stopping by. I really appreciate the views.
Like always, leave me comments and spread the word about my blog PRETTY PLEASE!!!

Kiss, Kiss.
-A

Sunday, August 18, 2013

Lifestyle Post - My Gym Workout 8.17.13

I have been trying so hard to get back in shape and get my pre-baby body back.
...Especially since Riley is almost 3 lmao.
But anyhoo, Ryan and I got a Lifetime membership about a month ago, and it has been helping tremendously!

First of all, for all three of us to go to the 3 different gyms in Indy, it's only about 125$.
Second, there's a child center where Riley can play.
Third, there's a SALON in the Castleton location!!!!!!!!

On to the workout.....

I started out with a warm up on the treadmill.
I walked for 10 mins at 3.5 speed on the Random setting so the incline changed. The machine automatically gives you a 3-5 min cooldown. So treadmill totals were:
14 mins
55 cal
.76 mi

Next I lifted a bit. And when I say a bit, I mean a teeny tiny bit.
I did pulldowns first.
3 sets of 15
60lbs

Then, I did the seated fly. That really hurt, by the way.
1 set of 15
1 set of 10
20 lbs

After that, I went on the dreaded stairmaster.
20 mins
1.05 mi
105.5 cal
40 steps/min avg
50 floors

Last, I did an elliptical type machine.
10 min
126 cal

And that was my workout! I went in the hot tub to stretch afterwards, and then showered and went home. It was a hard workout without making me wanna quit doing it haha. But I'm also a wimp when it comes to stuff like this.

Let me know when you guys do for your workout. I need suggestions!!!

Kiss, Kiss.
-A

Friday, August 16, 2013

Nail Post - Chunky Cheetah Print and Glitter

My other sister gets her nails done too.
They're both kind of addicted.
Follow Akira on Twitter and on Instagram.

I should get to the nails shouldn't I?

Well this design was super simple. It took me like 20 minutes to do.
So here's what you need for this one:

LA Colors  Base Coat and Top Coat
Wet N Wild Shine Nail Color in 405 Sunny Side Up
RedStar Nail Enamel in 08
IrisColors 1026 Black
Color Club 948 Platinum Record
dotting tool

I used Sunny Side Up as the base color for each nail, then topped all but the middle finger with Platinum Record.
I did the cheetah print on the middle finger.
Using the dotting tool, I made irregular blobs using the RedStar polish, and circled them with C shapes using the Iris Colors polish.

Here's the end result.
with flash

without flash

That's it!
I hope you enjoyed this. 
If you'd like to see more nail posts, just like this post or leave me a comment saying so. 

Kiss, Kiss. 
-A


DIY Post - Lip Scrub

Oops, I did it again! I went a week and a half without a blog post. Well here we go again...

This time I'm gonna do another new thing and make a do-it-yourself post!
I have desperately wanted a good lip scrub, and I don't wanna pay an arm and a leg for it.
Just Googling "lip scrub" gives me results where the least expensive scrub is 7$.
Uhm... No.
So I decided to just make my own with things I had around my house. The only thing I had to go out and buy was a container to store it in.

Supplies:

  • Small screw top container
  • Coconut oil
  • Honey
  • Granulated sugar
  • Spoon
In the clean container, 

add 1 1/2 tsp of sugar,

 1/2 tsp of honey,

 and 2 tsps coconut oil. 

Combine until you get an even consistency. 

Since coconut oil if a solid at room temperature, you may have to heat it a bit to get it to soften up to a point where you can incorporate the sugar and honey.
If you want a grittier scrub, simply add more sugar. 
Then just allow it to set again, either at room temperature or by putting it in the fridge. 

To use, just dip your finger in and rub this all over your lips! Because it's made entirely of food, you don't even have to rinse afterwards. Just lick those lips!

With DIY things that contain any kind of food, be sure to look out for any funny smells or molding. If either of these should occur, throw out your scrub and make a new one. 

I hope you guys enjoyed this little tutorial!

Kiss, Kiss.
-A
Tuesday, August 6, 2013

Hair Post - Controlled Natural Curl

hello, hello! I'm back again with a hair post this time. That's new!
So I've been natural for at least the last 6 years. I didn't cut it off and start over, I just stopped processing it. I do still use heat on my hair, but that's about it.
My mom is starting to get into natural hair styles and we were watching some Youtube videos the other day to find some ideas. Well I stumbled upon this awesome website called Curly Nikki, and it has all kinds of tips and tricks and everything you can imagine about natural hair. Well in looking through the "Styles" tab, I found a few videos that I liked and I wanted to recreate the styles shown.
Here is the look I recreated. The style is called a Bantu Knot Out. It was super easy to do. I did modify it to fit my needs and give me the look I wanted.

Here's a list of the products I used:

I started with freshly washed and conditioned hair. I used my wide toothed comb to detangle, and then  to part my hair into four sections. Here is what my hair looks like after its been combed through. 


I pretty much followed the video as well as I could. I sectioned off a bit of hair, separated that into two parts, and twisted them together. For each section, I applied a dime sized amount of the Creme Moisturizer to the length of it and the Curl Wax to seal the ends. Before doing any of this, I spritzed my whole head with the a mixture of my conditioner and water. I then twisted the hair around itself in a knot. 

Here is the halfway point.


I continued that process until my entire head was knotted, using the spray bottle to ensure that my hair was always wet. 


After all was said and done, I finished with a satin cap to sleep in. This will help to keep the knots from separating when moving in your sleep. It also helps to eliminate frizz. 


The next morning, I removed the cap and started to unknotting process. First, I unraveled the knots, then I undid the twists. Here is where I deviated from the video. Instead of leaving the curls loose and more wavy, I pulled apart the twists into smaller sections to have more defined curls. The products I used gave my hair a really nice shine, and it was really soft and not at all crunchy. 

Before styling


Showing off my length


After styling


That's it guys! And it was super easy!!! Like seriously, if I think it's easy, it really freaking easy because I hate doing my hair. 

Well leave me comments and please follow my blog. There's a link to my Instagram in the sidebar. There's a lot more posts there.

Kiss, Kiss.
-A

Friday, August 2, 2013

Nail Post - Metallic Glitter Gradient

WOW! So it's been forever. I've been a Susie Slacker haha.
Or maybe a Tired Tina, but whatever, I'm finally posting something new! YAY!

So this will be a pictorial on the nail look I just posted on Instagram. Follow the link to view my page and follow me please^-^

Supplies:

Step 1: Apply a coat of base coat.

Step 2: Apply one coat of white polish.

Step 3: Apply 2 coats of the gold polish to your first, second, and fourth fingers. Apply 2 coats of the silver polish to your third finger. 

Step 4:Using a makeup sponge, dab the blue polish onto a corner. Then press repeatedly onto the first and second nails until desired affect is created. Do the same with more of the gold polish to make the gradient more even.


Step 5:Apply the glitter polish on top of the silver polish in a gradient. Add a small amount near the cuticle, then gradually add more glitter down the nail so that it is the most concentrated near the cuticle. 

Step 6: Paint the thumb with 2 coats of blue polish.

Step 7: Apply top coat and clean off any excess polish. 

And that's it! I do hope you enjoyed the tutorial. Hopefully I will get to do another post Sunday or Monday. In the meantime, follow me on Twitter and Instagram. Both links are in the top right bar.
Until next time...

Kiss, Kiss.
-A